理解Node.js
2 介绍

使用JavaScript快速构建高性能可扩展网络应用的开发平台
3 LAMP WEB架构
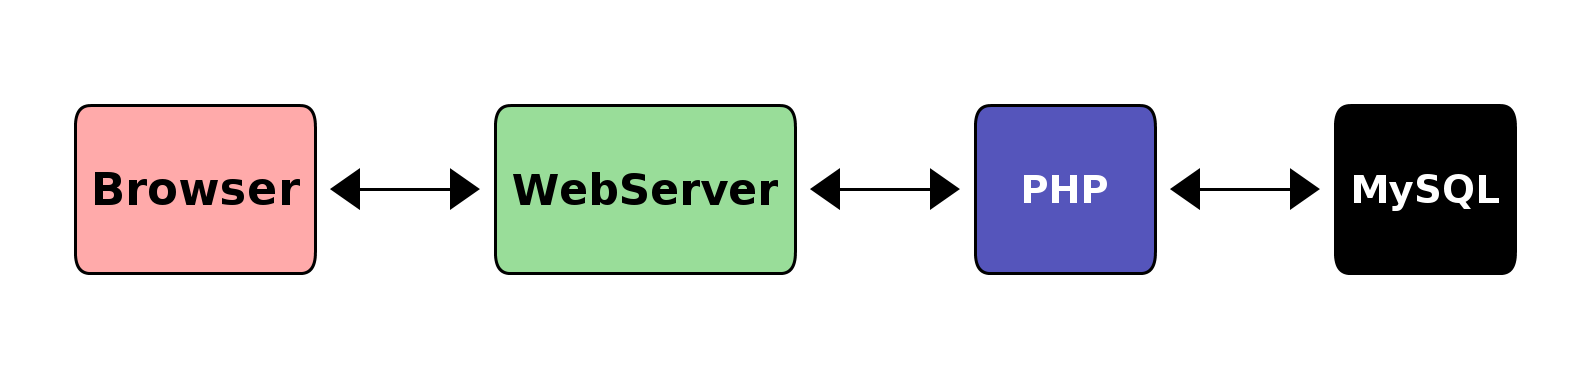
四大金刚
4 Node.js WEB架构
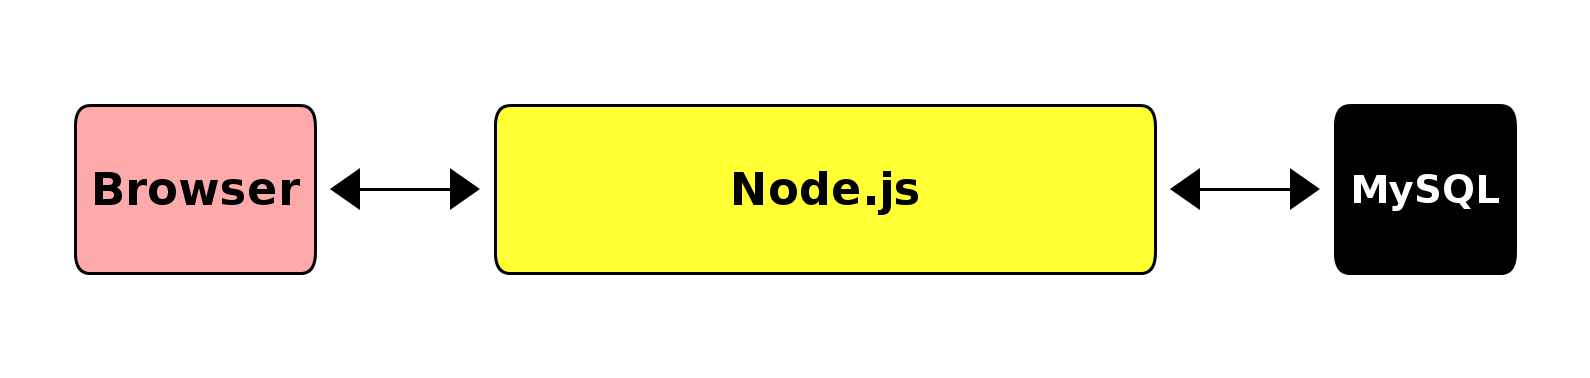
三个好汉
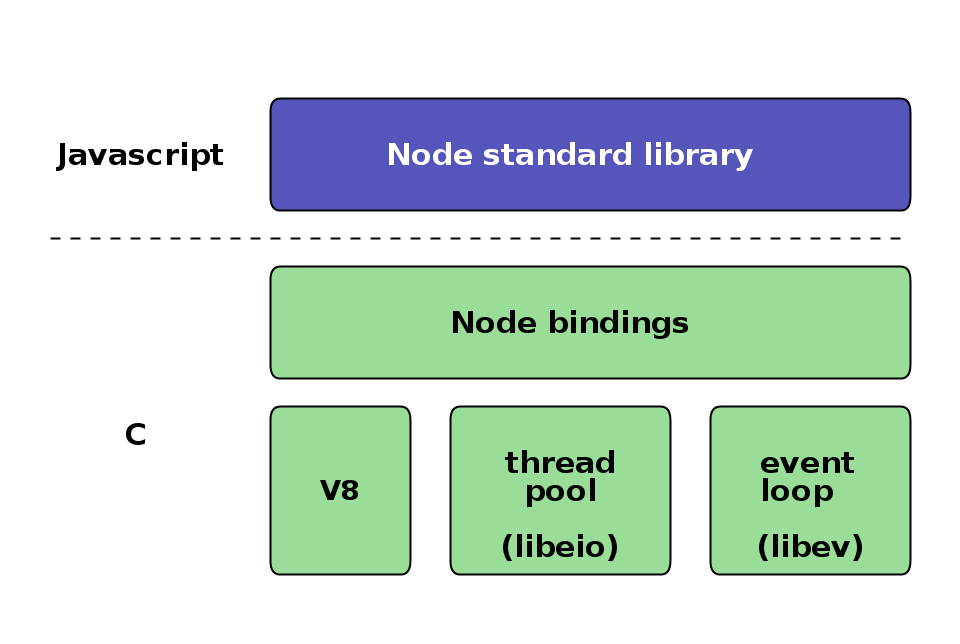
5 Node.js 内部结构
6 Node.js 用户案例

在服务端
我们的整个移动软件栈完全使用Node构建
第一个原因是可扩展
第二个原因是性能上的巨大提升
Node.js的优势在于:
- 更好的性能以及更少的内存占用,在某型情景下性能提升20倍
- 程序员可以充分发挥他们JavaScript的技巧
- 前端与后端开发人员可以在一个小组内协作
- 服务器从30台减少到只有3台,硬件资源利用率提升10倍,并且还有提升的空间。
- 开发工作可以更加专注在应用开发,而不是到处去救火
7 语言
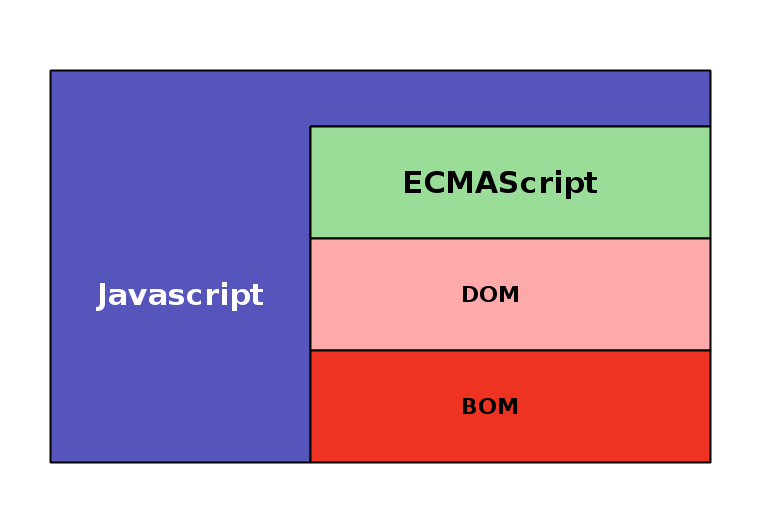
Only ECMAScript inside Node.js
10 安装

- /usr/local/bin/node
- 主程序
- /usr/local/bin/npm
- 模块管理程序
- /usr/local/lib/node_modules
- 全局模块目录
wget http://nodejs.org/dist/v0.10.12/node-v0.10.12.tar.gz
tar xzf node-v0.10.12.tar.gz
./configure
make
sudo make install
~$ node -e 'console.log("hello node.js");'
hello node.js
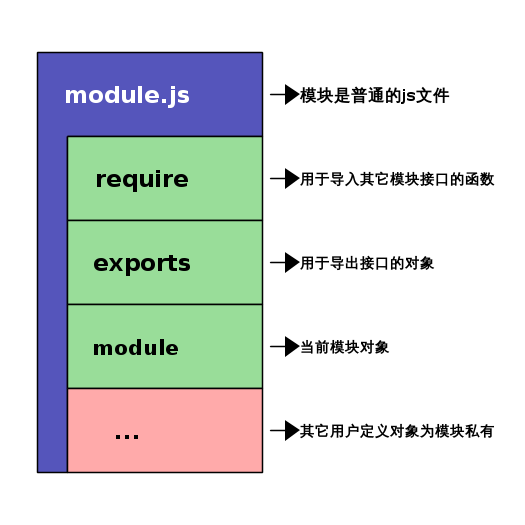
12 模块
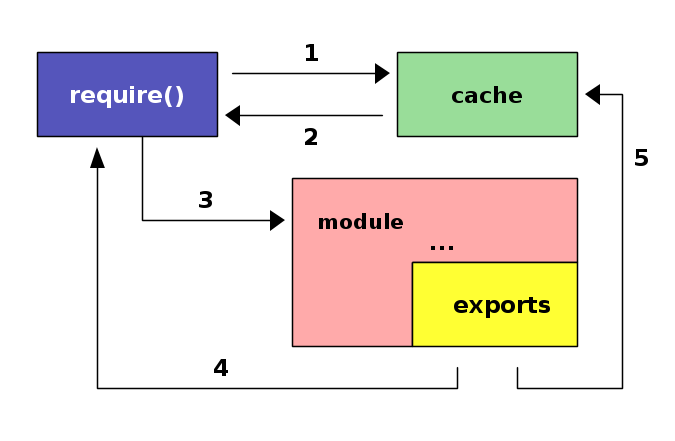
1,检查cache中是否有该模块
2,有则直接返回该模块的exports对象,require完成。
3,载入该模块并执行其代码
4,返回模块的exports对象
5,将模块加入缓存。
15 包
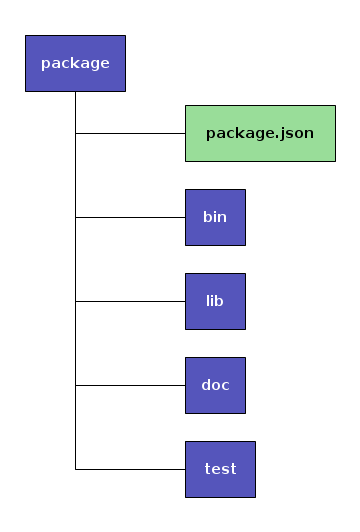
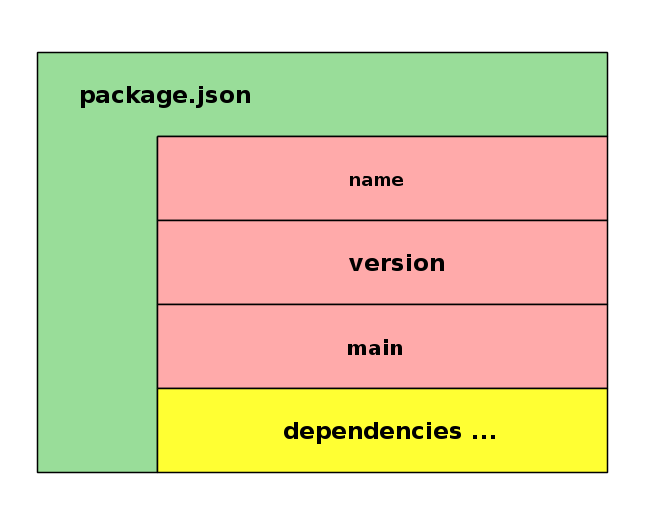
16 包
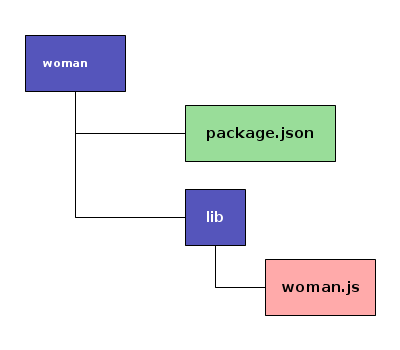
1: { 2: "name": "woman", 3: "version": "0.0.1", 4: "main": "lib/woman.js" 5: }
1:  var value = 10; //module private variable.
2:  module.exports = function (name, age) {
3:      this.name = name;
4:      this.introduce = function(){
5:          return this.name + " is " + (age - value);
6:      };
7:  };
17 包管理工具

- 什么时候安装到本地?
当你想通过require("package")的方式使用你的包,则最好安装为本地,这样node.js可以更快找到包。
- 什么时候安装到全局?
如果安装的包附带有可执行程序,需要在命令行使用,最好安装为全局,这样可以直接在命令行访问。需要注意的是全局模块目录不在node.js的模块搜索范围内,需要链接到本地模块目录。
- 什么时候链接到全局?
当你在开发一个供其它项目使用的模块时,通过链接到全局方便其它项目使用。
- 什么时候链接到本地?
对于附带可执行程序又通过require("package")的方式使用的包,可先安装到全局,再链接到本地,在多个项目使用同一个包时特别便利。
20 非阻塞
| I/O | CPU Cycle | Type |
|---|---|---|
| L1-cache | 3 | |
| L2-cache | 14 | Non-blocking |
| RAM | 250 | |
| Disk | 41000000 | Blocking |
| Network | 240000000 |

Node.js是一个全新的开发平台
所有会阻塞的api都以异步回调的方式进行封装
21 非阻塞

 1:  var mysql = require('mysql');
 2:
 3:  var connection = mysql.createConnection({
 4:      host: 'localhost',
 5:      user: 'root',
 6:      password: '123456',
 7:      database: 'mysql'
 8:  });
 9:
10:  connection.connect(function (err) {
11:      if(err) {
12:          throw err;
13:      }
14:
15:      connection.query('select host, user from user', function (err, results) {
16:          if (err) {
17:              throw err;
18:          } else {
19:              results.forEach(function(row){
20:                  console.log(row.host + '\t' + row.user);
21:              });
22:          }
23:          connection.end();
24:      });
25:  });
22 单线程事件回调
23 单线程事件回调
1:  <?php
2:      echo "wait...\n";
3:      sleep(3);
4:      echo "wait...\n";
5:      sleep(5);
6:      echo "done\n";
7:  ?>
PHP:
SLEEPIF YOU WANT


24 单线程事件回调
1:  console.log('wait...');
2:  setTimeout(function () {
3:      console.log('wait...');
4:      setTimeout(function () {
5:          console.log('done');
6:      }, 5000);
7:  }, 3000);
NODE:
NO SLEEP


27 模块化

通过组合模块构建应用
29 构建Echo服务
 1:  var net = require('net');
 2:
 3:  var server = net.createServer(
 4:      function (socket) {
 5:          socket.pipe(socket);
 6:      }
 7:  );
 8:
 9:  server.listen(8001);
10:  console.log("Server running");
~$ node ./echo_server.js
Server running
~$ telnet 127.0.0.1 8001
hello
hello
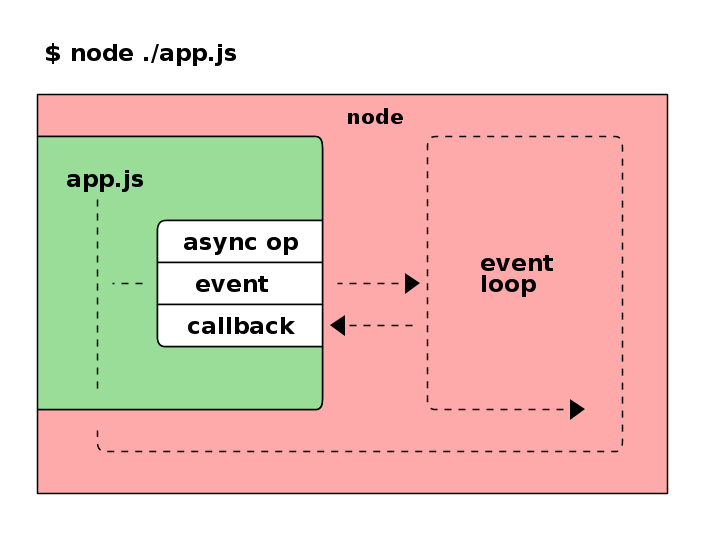
在Node.js中,除了代码,一切都是并行的!
现在我们来逐行解释发生了什么:
node ./echo_server.js
node.js解释执行echo_server.js,
然后进入事件循环,
如果没有事件需要处理则退出程序。
var net = require('net');
导入 net 模块,它是node.js自带的核心模块,对异步网络进行了封装。
net模块的js代码将被执行,返回该模块导出的一些函数及“类”。
1:  var server = net.createServer(
2:      function (socket) {
3:          socket.pipe(socket);
4:      }
5:  );
1 net.createServer创建一个tcp服务器对象,参数为绑定到服务器 connection 事件的回调函数,当node.js成功接收到一个连接时,该回调函数将被调用。
2 该回调函数的参数为新建立的tcp连接对象,它是一个 net.Socket 类实例,
3 echo的实现使用了Socket.pipe方法,该方法来自Socket的父类,将当前对象读取到的数据转发到参数指定的目标对象。
server.listen(8001);
TCP服务器在绑定在8001端口进行监听,这里省略了第二个参数
host(其默认值为INADDR_ANY),第三个参数backlog(其默认值为511),第四个数callback, net.Server的listen方法也是非阻塞的,绑定成功会调用回调函数callback,失败会发出error事件,这里为了示例的简单性没有进行错误处理。
console.log("Server running");
node.js引入了浏览器端JavasSript常见的一些功能。
如:console对象,用于输出日志;setTimeout函数,用于延迟执行。
但浏览器上特有东西在node.js中是不存在的,如:window全局对象的,在node.js中对应的是
global全局对象。
js文件解释执行完毕,接下来就由node.js的事件循环接管了, node.js等待事件发生,然后调用事件关联的回调函数,应用程序的逻辑会在事件回调中得以执行。
30 构建Http服务
1:  var http = require("http");
2:
3:  var server = http.createServer( function(req, res) {
4:      res.writeHead(200, {'Content-Type': 'text/plain'});
5:      res.end("hello node.js\n");
6:  });
7:
8:  server.listen(8002);
1:  ~$ curl -i http://localhost:8002
2:  HTTP/1.1 200 OK
3:  Content-Type: text/plain
4:  Date: Fri, 12 Jul 2013 08:28:42 GMT
5:  Connection: keep-alive
6:  Transfer-Encoding: chunked
7:
8:  hello node.js
使用node.js写HTTP Web服务与之前写的TCP Echo服务形式上非常相近。
var http = require("http");
导入
http模块。
http模块封装了HTTP相关功能,包括HTTP服务器与HTTP客户端。
1:  var server = http.createServer( function(req, res) {
2:      res.writeHead(200, {'Content-Type': 'text/plain'});
3:      res.end("hello node.js\n");
4:  });
1 调用 http.createServer 创建 http.Server 对象,参数为回调函数,当web服务器收到请求时调用该回调函数,回调函数接受两个参数:req(请求对象)、res(响应对象)。
2 发送HTTP响应状态码及消息头到客户端。
3 发送响应内容并结束当前请求。由于持久连接的存在,同一连接上可能存在多个请求-响应,
end用于指示当前请求已处理完毕。
res.end("hello node.js\n");
等同于
res.write("hello node.js\n");
res.end();
在客户端收到的响应中,有以下非预期的消息头出现:
1:  Date: Fri, 12 Jul 2013 08:28:42 GMT
2:  Connection: keep-alive
3:  Transfer-Encoding: chunked
这是node.js的默认设置,通过启用持久连接和流式数据传输,可以减少客户端连接和对响应数据的缓存,性能得到提升。
hack一下消除以上非预期的消息头:
var server = http.createServer( function(req, res) {
    res.sendDate = false;
    res.shouldKeepAlive = false;
    res.useChunkedEncodingByDefault = false;
    res.writeHead(200, {'Content-Type': 'text/plain'});
    res.end("hello node.js\n");
});
~$ curl -i http://localhost:8002
HTTP/1.1 200 OK
Content-Type: text/plain
Connection: close

hello node.js
32 基础Web框架:Connect

npm install connect
logger | 请求日志记录 |
bodyParser | 请求消息体解析器 |
cookieParser | cookie解析器 |
cookieSession | 基于cookie的会话支持 |
static | 静态文件服务 |
query | 查询字符串解析器 |
errorHandler | 错误处理 |
33 中间件的效果
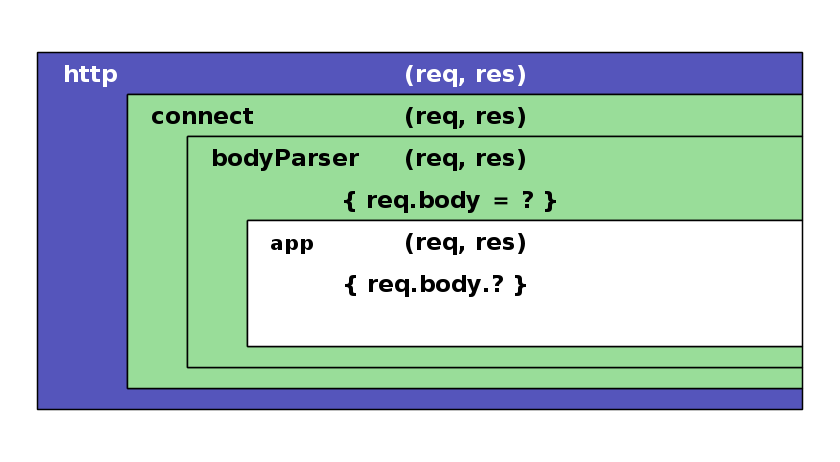
bodyParser中间件
35 Connect框架工作原理
构建Web服务需要使用大量的组件
解析提交的表单
权限验证
会话管理
静态文件服务
压缩
...
Connect将它们串联起来
http请求依次流过这些组件
每个组件对请求进行自已的处理
它们靠请求及响应对象传递中间数据
互相协作
最终完成整个请求的处理
Connect 提供 use 方法用于注册中间件到中间件队列中。
+-----------------------------+       +-----------------------------+      +-----------------------------+
|  +---------+                |       |  +---------+                |      |  +---------+                |
|  | request |                |       |  | request |                |      |  | request |                |
|  +---------+    +--------+  |       |  +---------+    +--------+  |      |  +---------+    +--------+  |
|                 |  next  +--+------>|                 |  next  +--+----->|                 |  next  |  |
|  +---------+    +--------+  |       |  +---------+    +--------+  |      |  +---------+    +--------+  |
|  | response|                |       |  | response|                |      |  | response|                |
|  +---------+                |       |  +---------+                |      |  +---------+                |
+-----------------------------+       +-----------------------------+      +-----------------------------+
use 方法用于在匹配的请求路径上挂载中间件。
| 参数 | 说明 |
|---|---|
| route | 请求路径模式。 |
可选,默认为 / 匹配所有请求路径, | |
| 用于限定中间件处理范围。 | |
| fn | 中间件。 |
| 中间件是一个函数 ”function(req, res, next)“, | |
其中 req 与 res 参数来自 http 请求处理函数 , | |
中间件通常会在 req 与 res 上附加或修改属性, | |
| 供其它中间件或应用逻辑利用, | |
next 用于调用下一个中间件, | |
| 中间件可以完成当前请求, | |
则不必调用 next , | |
否则需调用 next 由下一中间件继续处理。 |
使用示例:
app.use('/public', connect.static(__dirname + '/public'));
上面的例子提供 public 目录的静态文件服务,假设当前项目目录结构为:
docroot
   |
   |----public
   |       |
   |       -----node.jpeg
那么可以这样访问到 node.jpeg :  。
。
如果上面的示例中,不指定 route ,则可以在根路径下访问到 node.jpeg : 。
。
指定 route 为 "/static" , 则要这样访问:  。
。
这是因为 Connect 在调用中间件之前,会将 req 路径中的 route 前缀删除,这样中间件可以挂载在任意路径下。
36 高级Web框架:Express
Express是node.js的一个高性能、高级Web开发框架
以
Connect为基础

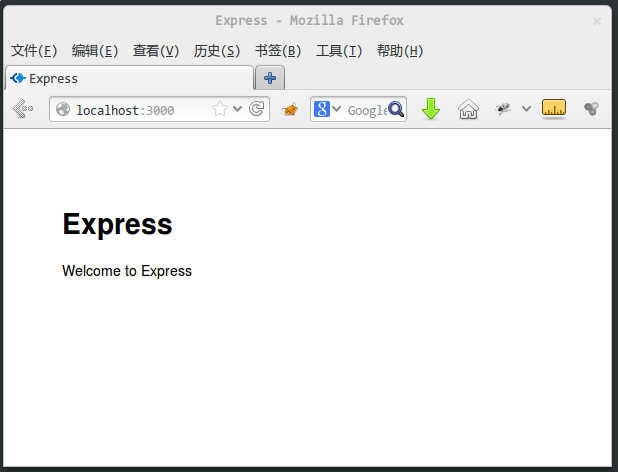
37 Express安装
$ sudo npm install -g express
$ express hello_express
$ cd hello_express
$ npm install -d
$ node app.js
hello_express
├── app.js
├── package.json
├── public
│   ├── images
│   ├── javascripts
│   └── stylesheets
│       └── style.css
├── routes
│   ├── index.js
│   └── user.js
└── views
    ├── index.jade
    └── layout.jade
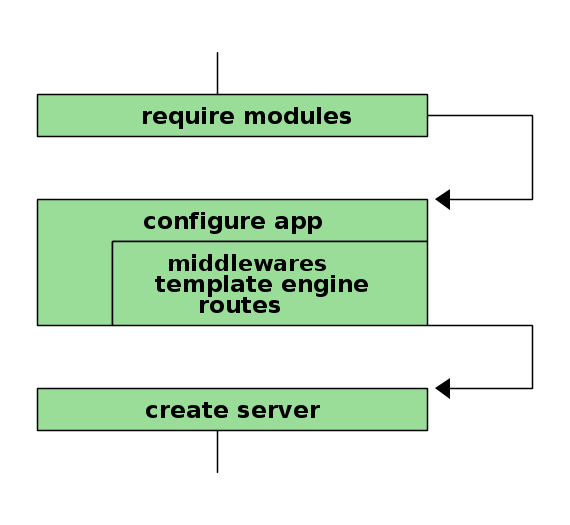
39 Express项目:app.js
 1:  /**
 2:   * Module dependencies.
 3:   */
 4:
 5:  var express = require('express')
 6:    , routes = require('./routes')
 7:    , user = require('./routes/user')
 8:    , http = require('http')
 9:    , path = require('path');
10:
11:  var app = express();
12:
13:  // all environments
14:  app.set('port', process.env.PORT || 3000);
15:  app.set('views', __dirname + '/views');
16:  app.set('view engine', 'jade');
17:  app.use(express.favicon());
18:  app.use(express.logger('dev'));
19:  app.use(express.bodyParser());
20:  app.use(express.methodOverride());
21:  app.use(app.router);
22:  app.use(express.static(path.join(__dirname, 'public')));
23:
24:  // development only
25:  if ('development' == app.get('env')) {
26:    app.use(express.errorHandler());
27:  }
28:
29:  app.get('/', routes.index);
30:  app.get('/users', user.list);
31:
32:  http.createServer(app).listen(app.get('port'), function(){
33:    console.log('Express server listening on port ' + app.get('port'));
34:  });
40 路由配置
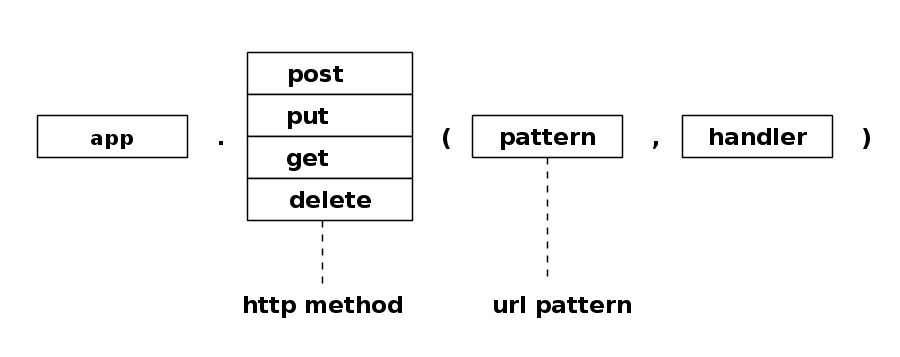
1:  //CURD式的url配置
2:  app.post('/users', user.create);
3:  app.put('/user/:id', user.update);
4:  app.get('/user/:id', user.read);
5:  app.delete('/user/:id', user.delete);
